The Institutional Research Information System (IRIS) provides a way for researchers in UCC to create and maintain an online research profile with details of their background, interests, publications, projects, and other involvements. The profile can be selectively published to the web, with only the relevant details included, and can be included automatically in the researcher's departmental, school, faculty, college, or project web site. Profiles can also be formatted as CVs for submission as part of funding applications, project plans, and consortium formations. The profiles form a part of UCC's and the individual's research record, and can be used for the evaluation of institutional and individual research achievement. IRIS does not currently contain details on research funding.
The new Institutional Research Information System replaces the previous InfoEd system, and all data from there has been transferred into the new system, along with all the data gathered in the 2009 Research Quality Review (Appendix A) documents. The initial phase of deployment involves a small number of pilot departments, and the system will become generally available on a phased basis during 2010.
9 February 2010 (rev 5)
When you log in, you will see your General Information (Figure 2). There are two menus:
a red menu bar towards the top of the window, with links to actions (Edit Profile, Publish Profile, Reporting), settings (Preferences), and help (FAQ, Logout, and Change Password)
a grey menu down the left-hand side, with links to all the sections of your profile. Click on these to view and edit the different parts of your profile
There are links to the Privacy Policy and Freedom of Information policy at the bottom of the window.
Your basic general information is automatically updated in the system by the Human Resources (HR) database. This includes:
your Staff Number
your name
your principal qualification[s]
the first block (only) of your Contact Address

This information is shown as it is known to HR (see Figure 2 above). You cannot change this information yourself: if there are errors, please contact HR to have it updated (see the link to How do I update this info?). Please do not ask the Webmaster or Office of the Vice-President for Research to update this information: it is the responsibility of HR.
⇛ However, when it comes to publishing your profile, you can choose which Contact Details block to publish; so if the HR-supplied data is incorrect you can select an alternative you have created yourself (see below).
You can freely edit the second (and any further) blocks of contact information. There is an Edit link to the right of each block which opens an editing screen where you can update the information (see Figure 3 below). There is a Delete link to allow you to delete a block.
The School/Institute field is mandatory, and you need to pick a value from the drop-down menu. This contains all the official names of Schools, Departments, and Offices in UCC. You cannot type your own text here.
The remaining fields are for you to include whatever
relevant contact information you wish to supply. There is a
calendar icon ( ) beside the Start Date and Finish Date fields to
ensure that dates are entered in the correct format.
) beside the Start Date and Finish Date fields to
ensure that dates are entered in the correct format.

When you have finished entering or editing the contact information, click on the button at the bottom of the window. If you want to cancel your edits, click on the button instead.
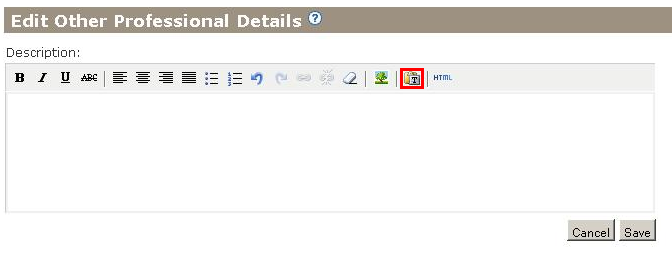
This section provides a mini-wordprocessor window where you can enter your biographical details. Click the button when you are finished.
When pasting text (here or anywhere else) which you
have copied from your wordprocessor or web browser or
other office application, use the special Paste
as Text icon ( ), outlined in red in the image below, to
ensure the text is cleaned up properly.
), outlined in red in the image below, to
ensure the text is cleaned up properly.
If you just use Ctrl-V to paste, you risk transferring all kinds of extraneous formatting garbage which will mess up your profile.
In this section you can upload your photograph. Click on the button to select an image from your own computer.
To use this, you will need to have at least one photograph of yourself already on your computer disk (copied from your camera or elsewhere). Images must be in JPG or GIF format (JPG is preferred for photographs) and the filesize must be less than 500Kb. This means that you must scale down any megapixel images from a digital camera. You can do this with any normal image-editing software: you do not need to buy anything, as you can download several image-editing programs for free (eg GIMP).
In the Research Interests section you can write your own description of research you are (or have been) involved with, using the mini-wordprocessor window provided. Click the button when you are finished.
This section contains your bibliography. All your entries from the old InfoEd system have been transferred into here, along with the information from the 2009 Research Quality Review (Appendix A). If there has been a problem in categorising them, or if information was missing or ambiguous, they will be shown in the Claim Area (see section 2.3.2, ‘Claim area’ below) and you will need to claim them before they appear in your profile.
Before using the Publications section for the first time, please set your Author Name and Keywords in the Preferences section. Click on the Preferences link in the red menu bar towards the top of the window, and then enter all the variants of your name and initials that are used by your publisher and journals (Figure 4 below).
Only use your surname and initials, separated by spaces. Do not add any punctuation. Click on the button to add each entry. These variants of your name will be used to find your publications in online databases.
You can also add keywords appropriate to your discipline and research topics, separated by commas, to improve the searching.
When you have finished, click on the Edit Profile link in the red menu bar towards the top of the window, and then click on to return to editing your publications.

Click on to see
the Claim Area (the book and other icons ( ) shown in Figure 5 below immediate underneath the heading
‘CHOOSE from the following
publications’).
) shown in Figure 5 below immediate underneath the heading
‘CHOOSE from the following
publications’).
Publications matching your preferred Author Name (see section 2.3.1, ‘First-time usage’) which have not yet been entered into your profile are shown in the Claim Area at the top. This may include some existing entries from the old InfoEd system or the Research Quality Review (Appendix A) documents if there was any doubt about attribution, such as an ambiguous author name or an uncertain publication type; as well as recent retrievals matching your name from online databases.

In this subsection you can enter new publications (see section 2.3.5, ‘Adding new publications manually’) and claim any unallocated publications from several sources:
unallocated publications from the old InfoEd system, if any
unallocated publications from the 2009 Research Quality Review (Appendix A), if any
publications matching your name and initials and keywords from online databases, including Web of Knowledge, PubMed, and others, if any
publications matching your name and initials and keywords which co-authors may already have entered
Further sources may be added in future.
click in the checkbox at the right of the entry, then click on the button at the bottom of the page.
if there are publications shown which are not yours (for example, wrong matches for your name from online databases), you can disclaim them by clicking the checkbox at the right of the entry, and then clicking on the button at the bottom of the page.
if no claimable publications are shown, then there are no outstanding entries to be claimed.
You can add new publications yourself in two ways:
by uploading them from your existing personal database (eg BIBTEX, JabRef, Zotero, EndNote, ProCite, Reference Manager, etc): see section 2.3.4, ‘Publication import/export’
by clicking on one of the links under ‘CREATE a new publication’ at the foot of the page for the relevant type of publication (see bottom of Figure 5), and adding the entry in the form provided (details in section 2.3.5, ‘Adding new publications manually’).
This section allows you to upload existing publications from a personal bibliographic database such as BIBTEX, Zotero, JabRef, EndNote, ProCite, Reference Manager, etc; and to import entries from online databases of publications.
Click on Import Publications from PubMed and type in suitable keywords, or the PubMed ID (PMID), and click on . You can also enter a % (percent) sign in the Keywords field to act as a wildcard.
If there are matching publications, they will be shown in the same Claim/Disclaim format used in Figure 5 (see section 2.3.3, ‘Add new publication’) for you to claim or reject.
The other three sources are for personal bibliographic databases. IRIS can import your existing entries and also export selections (or all) of your stored entries from your profile. In the following sections we deal only with importing (uploading).
Whatever the type of personal bibliographic database you use, you must provide your entries in one of the three compatible formats: EndNote-XML, BIBTEX, or RIS. All known personal bibliographic databases are capable of saving your entries in one of these forms, and you must do this before uploading them.
Click on Import Publications from EndNote xml format file and then click on to select your .xml file of entries from your computer disk. Note that you must already have saved the entries from EndNote, ProCite, Reference Manager, or other system into EndNote-XML format beforehand, using the menu in your personal bibliographic database. When you have located your exported .xml file with the button, click on to upload and import the entries.
Users of LATEX, ConTEX t, and other TEX systems using BIBTEX: click on Import Publications from BIBTeX and then click on to select your .bib file. Click on to upload and import the entries.
The RIS format (Research Information Systems) can be used as an export and import format by most personal bibliographic database systems. Click on to select your .ris file. Click on to upload and import the entries.
To add a publication using the form, click on one of the publication types that are in the links at the bottom of the Add New Publication page (see bottom of Figure 5):
The More Publications link provides access to a drop-down submenu in the form with dozens of other publication types not shown here for reasons of space.
If a specific type of publication that you need is not shown, contact the please email iris@ucc.ie to ask for it to be added.
If your publication information is not already in a personal bibliographic database or an online database, you can enter it by typing, or by copying and pasting from some other local source.
If your publications are listed in online sources, you can save yourself a lot of typing or copying-and-pasting by using the ‘Download Citation’ function on these types of web site:
the numerous databases accessible from the UCC Library website
your publisher's or journal's web site
the UCC or other library catalogues
You can also use Zoteroa to extract and record the information from those web sites, and then save it in BIBTEX or RIS format ready for uploading and importing into IRIS.
Zotero is a free plugin for the FireFox browser. Details of how to use it are in Reference management software/Zotero. ⇚
The ‘new publications’ form (Figure 6 below) is slightly different for some types of publication, as they have different requirements. Most of the fields are self-explanatory, but a few require foreknowledge, which is noted in the list below.

Author and Editor names: please read the online help (click the i beside the Author field). Multiple authors must be separated by a semicolon
Month is currently compulsory. This will be changed soon; if the month is unknown, then please use January for the moment
Titles must be given in full and without enclosing quotes.
"Laughter and Language in 'Romeo and Juliet'"
Laughter and Language in 'Romeo and Juliet'
Embedded quotes around cited titles should remain. There is no provision for italics, bold, or equations (TEX markup can be used for mathematics).
If your chapter is untitled, just give the chapter number.
See the general comments in the 1st item in this list, ‘All types’ above.
The list of journal titles is held separately in an Authority list maintained by the Office of the Vice-President for Research.
If the title of your peer-reviewed journal is not shown, email iris@ucc.ie and ask for it to be added.
For these journals, give the full journal name.
This type is for papers published in a volume of Proceedings. Other forms of conference presentation which have been published go in the ‘Conference Contribution’ type under ‘More Publications’.
Conference presentations and other contributions which have not been published go in the ‘Professional’ section under ‘Conference Contribution’.
A few publication types are missing some required fields. Until this is fixed by Vidatum, please adhere to the following conventions, which will make it possible to resolve the problem at a later stage.
If a Conference Publication was published in a Journal (individually or as [part of] a special issue on the conference) instead of in an independently-published Proceedings:
put the name of the journal and the volume/issue into the Conference Title field with a space after the journal name (no comma) and a colon or slash separating the volume and issue numbers
put the conference title and the location into the Location field, separated by a comma
| Conference Title | TUGboat 12:3/4 |
| Location | TeX Users Group Conference, Portland, OR |
Use the Conference Contribution type under ‘Other Publications’, but put the title of the conference (which is not provided for) in the Edition field.
Although these look odd here, sticking to this convention will enable the data to be displayed in a usable form for the moment, and to be rearranged correctly at a later date when the proper fields are provided.
See the general comments in the 1st item in this list, ‘All types’ above.
This section provides access to a much longer menu of more publication types covering (at the time of writing): Abstract, Annotations/Encodings, Audio Tape, Book Reviews, CD-ROM, Composition, Dictionary Entry, Dissertations/Theses, Documentary, Editorial, Encyclopedia Entry, Fact Sheet, Field Guide, Film Production, Foreword, Full maps , Guest Lectures, Guest Speaker, Index, Invited Lectures, Invited Review Articles, Invited Seminars, Invited papers, Manual, Miscellaneous, Newsletter, Newspaper Articles, Performance, Poems, Policy Contribution, Presentation, Presented Papers, Programme Note, Published Case Studies, Published Letters, Published abstracts, Radio Presentation, Reports, Review Articles, Software, Technical Publication, Translation, Video/TV, and Working Paper.
If there is a further type of publication you need which is not in the list, please iris@ucc.ie and ask for it to be added.
In addition to entering your new publications, please review all publications that were transferred automatically from the InfoEd system and from the Research Quality Review (Appendix A) documents, to ensure that the right information is in the right fields.
The entries you select (see step 1 in the procedure in §3) to be published in your Profile will be formatted based on the fields you use to enter them. Please ensure that the right information is in the right place.
See particularly the note ‘Temporary solutions to missing fields’ in the list in this section above about the special use of the Location and Conference Title fields for Conference Publications to get around a temporary deficiency in the fields available.
The grouping ‘More publications’ is only used here to save menu space because the list is very long. When your profile is published to the web, each publication type is presented separately, and the heading ‘More Publications’ is not used.
This section covers those activities which do not usually result in formal publication. Each subsection is laid out in the same way (see the example in Figure 7 below).

Click on one of the subsections listed (Honours & Awards, Professional Associations, Patents & Licensing Agreements, Conference Contribution, Committee work, Employment, Education, Languages, Consultancy, Outreach Activities, Reviews, or Other) to show your entries.
To add an activity, click the Add New link above or below the list of entries to bring up the form for that section.
This section covers your teaching and supervisory activities. Each subsection is laid out in the same way (see the example in Figure 8 below).

Click on one of the subsections listed (Teaching Interests, Recent Postgraduates Students, or Current Postgraduate Students) to show your entries.
Each entry uses a mini-wordprocessor window like those in section 2.2, ‘Research’ and section 2.1.2, ‘Biography and interests’ where you can enter the details. Click the button when you are finished.
The Modules section is automatically filled from the details of modules for which you are responsible, taken from the records in the DMIS. It is the responsibility of departmental administrators and lecturers to ensure that the DMIS entries for the assignment of Modules is correct.
Each entry uses a mini-wordprocessor window like those in section 2.5, ‘Teaching activities’ where you can enter the details for both Internal and External collaborations. Click the button when you are finished.
 Keep up to date with our RSS newsfeed Keep up to date with our RSS newsfeed |
Flynn, Peter • 2010-04-26 • (other) |